skip to main |
skip to sidebar
Though the ancillary tasks have been our focus for the last few days or so, we still have one particularly pressing issue on our minds - the completion of the video proper. Now that the audience feedback has been fully digested, it is time to press on with the completion of the full video. It gives you an added bit of motivation (not that we need any extra) to know that you are so near to seeing the video and all of the ideas that went into it being completed and coming fully to fruition.
The first and probably most important bit of editing still to do is to actually fully implement the overlay effect onto the entire video. Here we ran initially into several problems, chief among which was that, on the original settings we had planned to use (see the Video Effects post), due to the camera footage quality, the image badly distorted in some places, and certain colours began to look very odd. Therefore we decided to experiment a little more with the colour settings of the overlay. 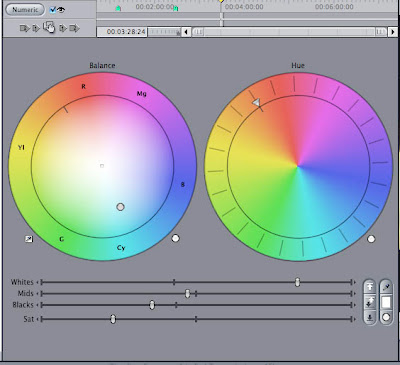 Here is a screenshot of the modified overlay settings. The settings use a combination of low blacks (to bring out the shadows in the background) and high whites to brighten the contrast up, as well as very low saturation.
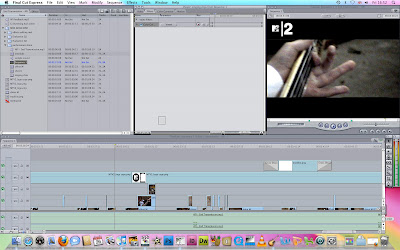 Here is a the method used to implement it onto the entire video, to save time having to implement it onto each individual clip. This screengrab is taken right at the point that the overlay effect is being dragged and dropped onto the sequence timeline.
Below are several screenshots of our results.
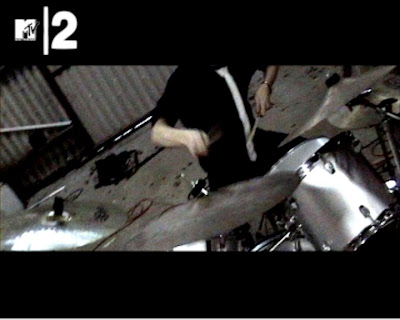
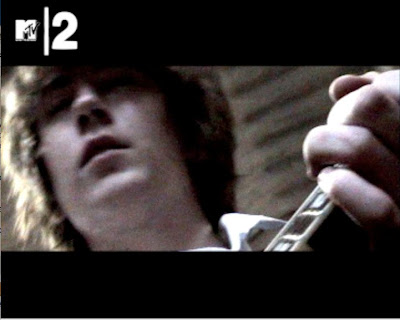
As you can see, the distortion is minimised, and actually in some cases almost blended into the feel of the video overall, whilst the colours give the video a very cold feel and look, but there is just enough colour left to give it some life. Also, the overlay emphasises the blacks and shadows, to such an extent that when there are moments of brighter light, they appear to brighten on-screen as the video plays, giving it an extra effect and feeling of life and vibrancy in amongst the cold greys.
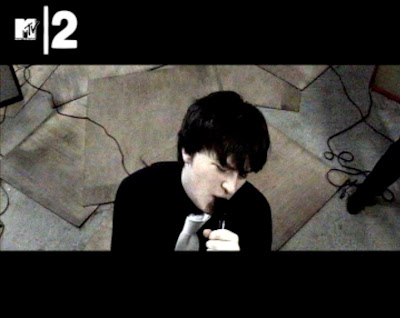
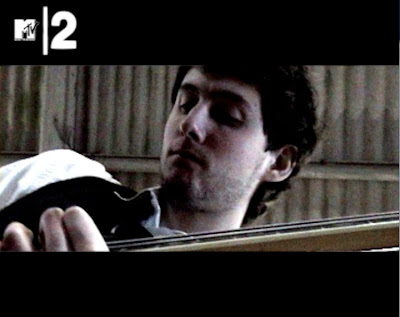
Also, you may notice that an MTV2 logo has appeared in the top left corner of the screen. This is part of the finishing touches we are applying to the video, to give it that final look of a real music video, by giving it the appearance of how it would look if it were to be aired on a typical rock/alternative music video TV channel. Below are several screenshots showing how it is implemented into the video. The first shot is the original logo, and as you can see, the vertical dividing bar and the 2 are invisible here as the background colour of this image is white, but in reality it is actually clear, meaning that when the image is placed on top of another colour, whatever the background colour is will become the background colour to the logo, so as you can see in the screenshots from the video, when implemented onto the black part, the whole logo shows up nicely. Below are the settings applied to the logo to place it in the video.
  As you can see, the main adjustment is in scaling down the image to fit into the left corner of the video and to the appropriate size of music channel logos, as they appear on screen during broadcasting.
The last element to be applied is the faded in and out song details that appear at the start and end of the video when it is broadcast on music TV channels. Now, we first decided what details to include, and in most cases, the details are shown as follows:
Band Name
Song Title
Record Company
Year of Release
This is how the details looked having been created in Photoshop. 
Next stop is it's implementation in the video itself, and for this we used the same option as for the MTV2 logo, but also applied a subtle drop shadow to it using this option in Final Cut below: 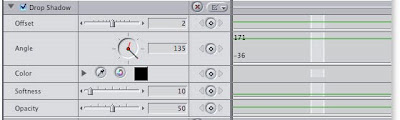
Below here is a screenshot of the timeline with the MTV2 logo and the song details applied to the video, and below that is a screengrab from the video itself showing the logo and the song details as they would appear in the video.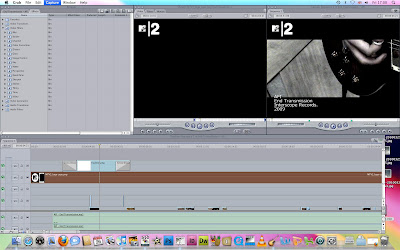
 With these edits complete, plus a few minor edits based on our audience feedback, we will finally be complete with our music video - happy days! More to come...
Once we had assembled a basic formation for the video, it is time to get down to the business of the detailed editing of the video.
We started by matching up the footage of the singer to the track, and ensuring that the lip-synching was accurate. Below you can see a screengrab of the timeline.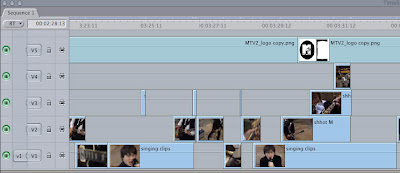 This shot shows the arrangement of the clips to keep the clips all in time - simply overlaying one over the other. This makes it much easier to lay clips into an order which matches the music without knocking other clips out of sequence or the singing out of time with the song.
The next part revolved around the intro of the song. The original song has a quiet, atmospheric intro, and so to accentuate this alongside the footage, we decided to modify the volume levels on the track a little to give it more of a fade-in than the original had. Below is the screen used to modify the sound levels of the track: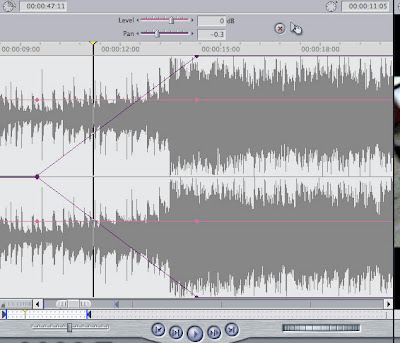 As you can see from this screengrab, the levels can be directly modified and the level and timing of the fade can be extended or retracted, and the pan option at the top of the screen allows the user to pan the sound to the left or right speakers, but this option isn't required by us.
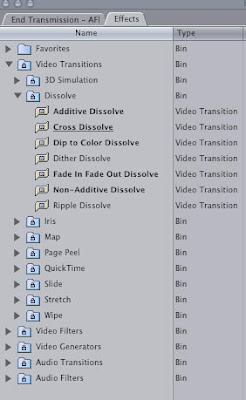
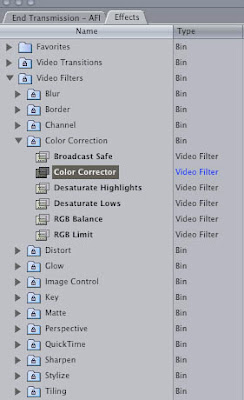
 Next comes the application of several effects from the drop-down Effects menu, starting with the colour corrector overlay tool. Then comes the Gaussian Blur, which we will use for a section in the bridge to add a sense of mystery and etheral other-worldness into the action of the performance. Also, under the Dissolve catagory comes the Cross Dissolve section, which is used for the very start fade-in and the fade-out at the very end of the video. On the left are the screengrabs of these options as they appear in Final Cut.
Next comes an interesting effect that Mike has in mind, which involves assembling and gapping a selection of very short clips to create a very fast, blinking, almost strobe-type effect with the image. Below is a screengrab of how the clips would be layed out and the length of the clips in question to achieve this fast-paced effect.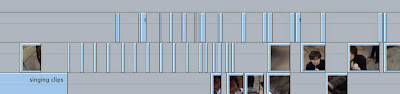
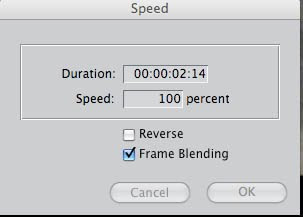
Our final addition is to modify subtly the very final shot of the video, where the singer throws his arm out to the right and spins to face away from the camera whilst still holding on to the microphone, before moving back to face the camera again. When we watched this piece of footage back, the singer moved to face the camera again a little too quickly for our liking, and it meant that the video sort of ended a little abruptly. We were loathe to use another shot to end the video on, so instead, we subtly modified the speed of the clip a little to make the singer's movement back to face the camera more slow-motion. Not only did this give the video a smoother ending, it also added a slightly etheral feel to the movement, as it blurred the image a little bit. The Speed modification option is brought up by bringing down the Modify menu at the top of the screen, as seen in the first screenshot below, and the second screenshot shows the screen that appears and the speed modification options available - the ability to change both the duration of the modification of the speed in the clip and the percentage of speed reduction (or increase). 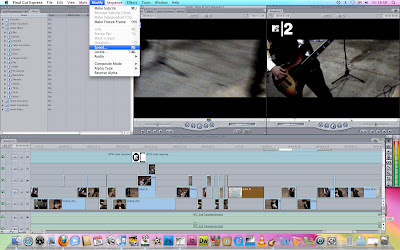
 More to come...
Now that we are happy with the footage we have so far, we can begin to edit it down into a cohesive video.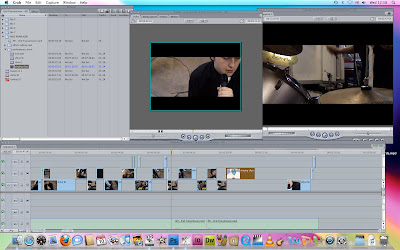 Now, for the entirety of the editing stage, we plan to use the Final Cut video editing software, due to its incredible versatility and vast scope for modification - there would be no way that our creative plans for the footage and the video would be stifled due to software limitations here.
Obviously, the first step is simply seperating the various sets of footage out from the one long clip which is created when the footage is copied from the tape to the computer, and dividing them down in terms of shots of each band member, e.g. seperating all the shots of the singer, guitarist, bassist, drummer etc. into individual sections, to speed up the intial assembly of footage. From there it's a matter of modifying the clips, lengthening or shortening clips wherever needed to, and matching them up to the track.
More to come...


 Here is a the method used to implement it onto the entire video, to save time having to implement it onto each individual clip. This screengrab is taken right at the point that the overlay effect is being dragged and dropped onto the sequence timeline.


 With these edits complete, plus a few minor edits based on our audience feedback, we will finally be complete with our music video - happy days!


